Tuesday, June 11, 2013

Watermelon Art

Many thanks to my friend,The Despicable Avenger, for sharing these pictures from a  watermelon carving contest in Italy!  (These are some of my favorites)


Many thanks to my friend,The Despicable Avenger, for sharing these pictures from a  watermelon carving contest in Italy! 

Monday, May 6, 2013

Sumi-E: ink and brush.

  Sorry I haven't posted for a while! I kept meaning to, and I'm glad to get back to blogging!
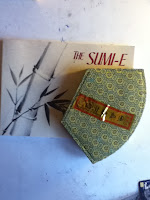
Sumi-e- one of Japan's most famous art styles...and a favorite of mine.


This is a sumi-e kit.

                                                              And this is what's inside;


There are four brushes, stored in the top, and (clockwise from top) paint brush holder, marble block that I never use, water basin w/ lid, basin for mixing ink, red oil based coloring paint, and a traditional ink stick.


panda

a bird
 There all sorts of things to do; just about anything, if you know the right brushstrokes. The main thing to remember; the key thing to sumi-e is that all the pictures are made up of long, sweeping, and curvy brushstrokes.  
a very lost penguin

chrysanthemums
Sumi-e is really a very beautiful form of art, and the pictures come to life in their own special way.

Friday, April 12, 2013

Art: Faces, Vases, and Style

What makes something art? What makes some forms of 'art' more popular than others?
Because art is in the eye of the beholder. And taste varies. So does style.

 For example, If you asked three different people to draw "a picture of a girl's face, with bangs, big eyes, and a small mouth, drawn with a brush pen," you might get something like the following results:
 

(I'm not using the real names of these artists.)

Nieda's
Ann's

Stella's(mine) 

As you can see, we got varied results, but all three stuck to the guidelines(Ann had the eyes closed, but they are still big).  And they all look different because the artists had different tastes, and probably were feeling differently when they were drawn.


 Okay, if taste varies, why will most people agree that the vase on the left is most childlike,the one in the center is the prettiest, and the one on the right looks more disco-y?

Because our minds have 'guidelines'. take the one in the center; it has delicate lace-y leaf designs, a smooth, curvy, natural shape;the other two are irregular and loud, but at least they look 'modern'...

The point is that several  things can effect our views of art; opinion, taste, style, and how much we appreciate the work of others and ourselves.

Saturday, March 23, 2013

Getting Ready for Summer??!!

Its barely spring! Why am I making a blog post about summer stuff when yesterday was the first day of spring!?  Answer: because if you have any young brothers or sisters, you might want to start stocking up now.  This is a water-balloon-made-out-of-paper, so they are single use, and when you fill one up with water, you have to use it pretty quickly.  This is called a water bomb.


 You start out with a square of paper (if it's a rectangle instead of a square, this won't work). you crease it on one side, so it looks like a triangle. unfold it, then crease it on the other two corners. Then crease it in the center.

It should look like this:


Then comes the hardest part. You can see six triangles? Take the smallest four and tuck them inside the largest two.


I find it useful to shape it like a cone while folding the first time.
When you finish with both sides, it should look something like this:


The picture on the left shows what you should be seeing if you look t it through the top.


Then, fold up the two corners to make a diamond on one side at a time.

It should look like the below:

Then,fold in the sides of the diamond to look like the picture(I often have to tape it so it stays put).


 After that, fold the flaps on the top in, then do the same thing on the other side so it looks like the below geometrical shape... a somethingagon...
So here's the fun part; when your ready to use your water bomb, you blow up the somethingagon through the open end(in the finished picture its the bottom part). it will look something like a cube.


                  So here, you see the pictures of before, after, and after.  hope you have fun!

Thursday, March 14, 2013

Habemus Papem!

We have a new pope! And, since, half an hour after the announcement(but more than half an hour before we got to see him!)  I got bored of waiting so long a bit fidgety, so, being me, I wanted to draw a picture.. of the new pope, obviously! One problem, however: We couldn't see him. We had no idea what he looked like! So I drew in big letters on the top, HABEMUS,  and, on the bottom, PAPEM.
After that(and after told that I had misspelled it; I had spelled it ABEMUS PAPAM!), I drew the hands, body, and not the head. so as soon as he came out, I drew his face into the picture. I also added in the name on the lower left.
Habemus Papem! Viva Papem!


Thursday, March 7, 2013

Drawing Cats: The Importance of Details

Kinda mehh.
So I take an ordinary sheet of paper, and draw a normal short-hair cat. Takes about a minute. it turns out like:


Better, but a bit unreal.
OK, so there is nothing really wrong with it, its very painfully obviously paper. so I added a little shading, took about thirty seconds, and ended up with:


Cool...For a floating head.
Something that looks like a cat balloon! Though, really, when I said short-haired, I did not mean 'so-short-haired-I-cant-see-any-hair-at-all'. So I make the circular edge of the cats head a bit jagged, to look more like real fur. Then, I draw some short lines over the original shading in the same direction as the fur is going. It works better than you would think. I also add more shape to the muzzle and a bit of ear fur. Might sound extensive, but only takes a minute or two. And now it looks like:


Meow!
Much better! Now, I draw a body, some tabby stripes, and a bit of brown, orange and green (and a splash of red for the nose!), and there we go!

Thursday, February 28, 2013

Sugestions & Advice for Young Artists

Practice, practice, practice! .... Okay, even if you have read the smallest amount of art-lesson books, taken any art lessons, or asked anyone vaguely arty, you have probably heard that again and again.
So, here are some art tips that you will probibly be a bit more interested in
#1: Keep an art portfolio. it will turn out to be insanely usefull to look back on your work, and to have some place too keep the stuff.
#2: Look in other art, like in museums or even other peoples work. Then you can say, "I like these colors for this design." or, "I like the shape of this face, but not the hairstyle; I like that hair better." or, "Oh! I had never thought of drawing something like that, but it's cool!"  I often look at other sources, or my own older work, for inspiration.
#3: Practi Don't just look at one art course/book/source for your art lessons. There is no 'right' way to draw or sculpt or make music. Look at all sorts of ways to do it, than try your own style based on what you have learned.

Tuesday, February 26, 2013

Hello! a simple craft


Hi! I'm Stella  and I love Art. Art is a beautiful, expressive thing, in every form it takes; paintings, statues, crafts, music... all art! Art is a wonderful way of opening doors, showing ones inner self, and honoring God.  Art is everywhere,in the plants, animals and even fungi...A whole world of art. In this blog, I'm going to show you all sorts of colorful,beautiful drawings, paintings, and crafts... And the beauty of the world around us.

The picture below shows a simple friendship bracelet/ necklace.
take three strands of differently colored yarn, and double two over.
Tie them with the third strand and start braiding the five strands. When you reach the end of the shortest strand, tie off and cut the rest off except the longest, which you cut off all but an inch or two of. Tie it into a lasso,so that you can use it as a clasp. You will end up with a beautiful stripped designed bracelet, perfect for gifts or prizes.